
Hay is a necessary expense when it comes to keeping animals in your care, albeit an expensive one. There are ways to make it less costly for your operation, and what means you choose to utilize depends on your context and your operation.
This post is intended for those who do not have the equipment to make their own hay or are too small of an operation to put up enough hay for their animals. This is also a bit of a follow-up from some of the YouTube videos I’ve seen that shared some good tips on how to save money on hay including THIS video from my good friend Austin of the YouTube channel and podcast Homesteady.
Contents
Sourcing & Buying Hay
Tip #1: Find a reputable local “hay guy/gal” and stick with them for as long as possible.
If you can find someone who you can trust who doesn’t live too far away from you, and produces consistently good-quality hay at a reasonable price, stick with them for as long as possible. They will become your top go-to for good hay for your farm, and everyone else will be your second or third choice if your first source isn’t able to produce the quantity you need.
Such a relationship is built on mutual trust and respect, one because you, the buyer, are happy with the product your seller is producing and two, your seller is happy to produce and sell you more hay plus give you some tips and information on hay quality you might not get anywhere else.
Tip #2: Buy in bulk.
Rather than finding a few bales here and there, find someone who is willing to part with several months’ worth of hay. To do this, you daily much your animals will eat on a daily basis, then account for how much they might waste. For example, a 1000 lb cow will consume 25 pounds of forage in dry matter per day. On an as-fed basis, that’s closer to 30 pounds of dry hay. If we were to account for 30% waste (a high number, for good reason), that same cow might need about 40 pounds of hay per day. If you had 10 of those cows around the same size, that’s 400 pounds of hay per day, or 12,000 pounds per month or 48,000 pounds of hay for four months. That means needing around 800 small square bales (60 lb per bale) or 34.33 (rounded up to 35) large round bales that weigh about 1,400 lb per bale.
Once you’ve done the math, buying in bulk might sound more expensive at first until you realize that there might be a discount opportunity in store. Let’s say hay prices are at their highest of all time at $0.08/lb. (I realize other places are higher, like the Upper Midwest facing prices at $250/ton or $0.125/lb. Here in Alberta, Canada prices are between 6 to 8 cents per pound.) That means that the 1,400 lb bale costs $112, and a 60 lb small square bale costs $4.80. This is at $0.08/lb. If you were to buy 35 large round bales, it would cost $3,920 (recall from above we rounded up from 34.33 bales to 35). A load of 800 small squares would cost you $3,840. If you were to buy in bulk, there’s a chance you could get a discount of even just one cent per pound off the original price which could save you about $500 for the entire load. This means extra money set aside to use for feed supplements, cover crop seeds, veterinary supplies, and so on.
Buying in bulk also means you’re getting your hay from only one source. That one source is more likely to give you the kind of quality hay you’re looking for as opposed to that of multiple sources because it’s hay coming from one field, not five or ten or more. There are some other things to keep in mind aside from quality like moisture content and proper storage as we’ll discuss below to ensure that bulk purchase stays in good condition from the moment it comes off the trailer.
Tip #3: Buy hay all year round, if possible.
Not limiting yourself to purchasing feed at a certain time of year can open up opportunities for finding good hay that few others will be demanding. This is a good tip if you haven’t yet found yourself a hay guy/gal to buy from, and are still needing to shop around for deals on good hay.
If someone is willing to let go of some of last year’s hay at the start of the grazing period, jump on it (especially if it’s in still good condition). Also, first-cut, second-cut, or even third-cut hay that is being sold off the field or as excess to their needs is also worth checking out.
Naturally, this particular tip depends on where you live. If you have the kind of winter where the hay you need must already be in the yard, not on a truck somewhere on its way sometime soon, then this tip may not work for you. It will be extremely hard to find hay because often, at that time, it’s already in very short supply. Trucking costs for buying hay further away–one or more province or state borders away–might not justify the cost of the hay itself. However, you just never know what you find!
Tip #4: Start buying hay before the “big rush” where demand is highest and supply starts to dwindle.
Start buying before the competition starts heating up. Once everyone starts looking for hay, not only will the available supply start to dwindle but prices also creep up. Demand always tends to drive prices up if it’s in excess of supply (economics 101). You might also find that you’ll be getting the poorer-quality stuff that nobody else wants: the weedy, coarse, dusty or mouldy, and/or not-so-green feed. Don’t be that person!
Tip #5: Choose large round bales over small square bales.
I would only recommend this if you have the equipment to handle large bales, or the land area to be able to have the seller set bales where you’d like them to be or extra “manpower” in being able to roll them a short distance to where you want them to go. Otherwise, if you’re short on any one of these factors, small square bales might still be the best recommendation over large rounds. So, first, understand your context before deciding whether this tip is of value to you or not.
However, the primary reason that this would be suggested is due to price. Small squares tend to be a little more expensive than large round bales. Normally there is a higher demand for small squares by horse owners (and small so-called “hobby” farm type owners) as opposed to large round bales by beef cattle folks. Small square bales have also carried the expectation and reputation for being of better quality than large round bales, however, bale shape and size don’t tell you anything about quality like a feed test will (see Tip #9) or how it was stored (Tip #10).
If you have the equipment to utilize large round bales, they are a cheaper source of hay and are great to unroll on a pasture or old hay field to feed out during the winter. One large hay bale, for a small group of animals, can last a lot longer than one=–or even three–small square bale[s]. If you’ve got more animals and more mouth large round bales are obviously the wiser solution as it minimizes the labour involved at feeding time.
Tip #6: Purchase straight from the field.

If you’re able to, buying the hay right off the field can solidify your supply as soon as the hay is made. This way you have control over when you’re going to be taking it home and how much you’re going to get. It also means less work for the seller since the hay is going, basically, from the baler to your storage shed (or yardot from their field to their own storage yard or shed.
Note though, that just because you purchased straight off the field doesn’t mean you could–or should–take the hay off immediately. Hay bales go through a “sweat period” of about 3 to 7 days where the harvested plants release a lot of moisture, heat, and carbon dioxide as the harvested plants complete their respiration process and dry up and die in the bale. This is completely normal.
I must mention this because this respiration process carries a significant risk of spontaneous combustion, particularly if the bales are taken off the field and stored too soon. This means a total and very costly loss in feed. If by chance, fire isn’t an issue, then loss in protein content and overall nutrient quality by “caramelization” is another issue to contend with. This is especially a problem in high-moisture hay. The hay gets a brown, slimy mould caused by the Malliard Reaction that significantly reduces feed quality, despite it being tasty to livestock.
Ask if the seller is willing to allow the bales to sit in the field for a few days before you come to pick them up. Knowing that this sweat period occurs, it would be hard pressed for them to say no, you cannot.
Tip #7: Offer to help your hay seller with hauling or storing hay to try to get a discount.
Sometimes labour is short and time is of the essence, so if you’re able with a bit of know-how, offering to help with the duties that come with taking hay off the field and hauling it to the yard can mean less work that your seller needs to do. Be mindful of your abilities though, and whether your seller is comfortable with your help or not! Let me try to put this gently: people mean well when they want to or try to help, but when things don’t go smoothly or they’re not as capable as they thought… it can leave a sour taste in a person’s mouth, to put it mildly.
Tip #8: Beware of cheap or free hay.
Unless you need it for some soil health practices such as adding litter to the soil, try to avoid this “too good to be true” selling point. This hay may be moldy and dusty, very low quality, full of noxious weed seeds that you don’t want on your land, old stuff that’s been sitting outside in the trees or an improper stack for well over a year, very coarse hay, whatever. Buyer beware! Make sure to check it out first before you decide to take it home.
Have a hay moisture probe tester with you. This will tell you whether the hay has been baled up wet (and therefore prone to spoiling from heating), or if it’s at the right moisture level. Hay should baled (in thebe no higher than 15 to 18% moisture. Small square bales should be even drier, at no more than 12 to 15% moisture. Large round bales can usually get away with being slightly more moist, but not by much. Most cheap hay will be in the higher moisture range.
Finally, look at the bales themselves. Bales that have not been done up properly (baled up tight so they’re firm and hard, keeping their cylindrical or rectangular shape long past their sweat period) will slump and look saggy. Moisture is more able to penetrate into the bale, inviting spoilage to occur a lot sooner as opposed with a properly-made bale.
Feeding & Storage
Tip #9: Mind the quality! Get a feed test done on your hay.
This is perhaps the most important tip of them all. It is going to save you a lot of money to know where you’re at with a feed test, because it will mean the difference between not knowing and having your animals lose condition (if the feed is poorer quality than you thought), and knowing and planning out the best way to feed this and add supplementation.
What you need to do is to get a probe that is usually powered by a hand-drill (some are a hand-crank) and use it to penetrate the middle of the bale, preferably in between the strings. The probe needs to go as deep into the bale as possible. Repeat, for every 100 bales, on 20 other randomly chosen bales. Collect all the probe samples in a pail. Mix them together and collect enough to fill a bread bag half to two-thirds full.
Put the sample in the fridge as soon as possible. Send it away to a preferred feed lab, with a form filled out to what sort of test you want. I would recommend you get one with energy, protein, fibre content, macro-minerals (calcium, phosphorus, etc.) and micro-minerals (iron, copper, etc.).
The feed test you get back will tell you where you’re at with the nutrient quality. If you need help, I also highly recommend to contact a nutritionist or a private consultant that is able to read your report[s] and interpret the results for you.
Tip #10: Properly store your hay to maximize quality.
Depending on the type of hay bale you get, you may choose to store the hay indoors or outdoors. Regardless, they must be stored in a well-ventilated area so that, if you purchased hay that haven’t finished their sweat period (see Tip #6), there is enough breathing room for the heat and moisture coming off the bales to escape.
Ventilation is especially important for indoor storage, like in hay lofts of a barn or a closed-sided shed. As mentioned, this gives the bales the ability to “breathe” and also reduces risk of fire from heating bales. It also reduces chance of spoilage from occurring. Hay bales properly stored indoors can keep their quality for years!
Bales stored outdoors also need to be stored so that they too can get sufficient ventilation. Large round bales are designed so that their round edges wick off moisture, as long as their stacked so that their round edges are able to do what they’re intended to do. Square bales, however, need to be stacked with a tarp over top to protect them from the weather.
Round bales must also be stacked to minimize risk of spoilage. This is discussed in the next tip below. Where they are stacked is equally important! Place them on the top of a hill where moisture will run away from their bases instead of collecting there.
Also, it would be equally ideal to place logs or pallets underneath to elevate them off the ground. This also reduces spoilage which normally occurs when bales are in contact with the ground for a period of time. Mowing the grass prior to placing the bales and keeping the area mowed will also help.
Tip #11: How to store large round bales outdoors.
In the previous tip, we briefly discussed how hay bales must be stored on a hill rather than in the valley where water can collect, and to place wood pallets or logs underneath to elevate them off the ground. Now we look at how to properly store them outdoors.
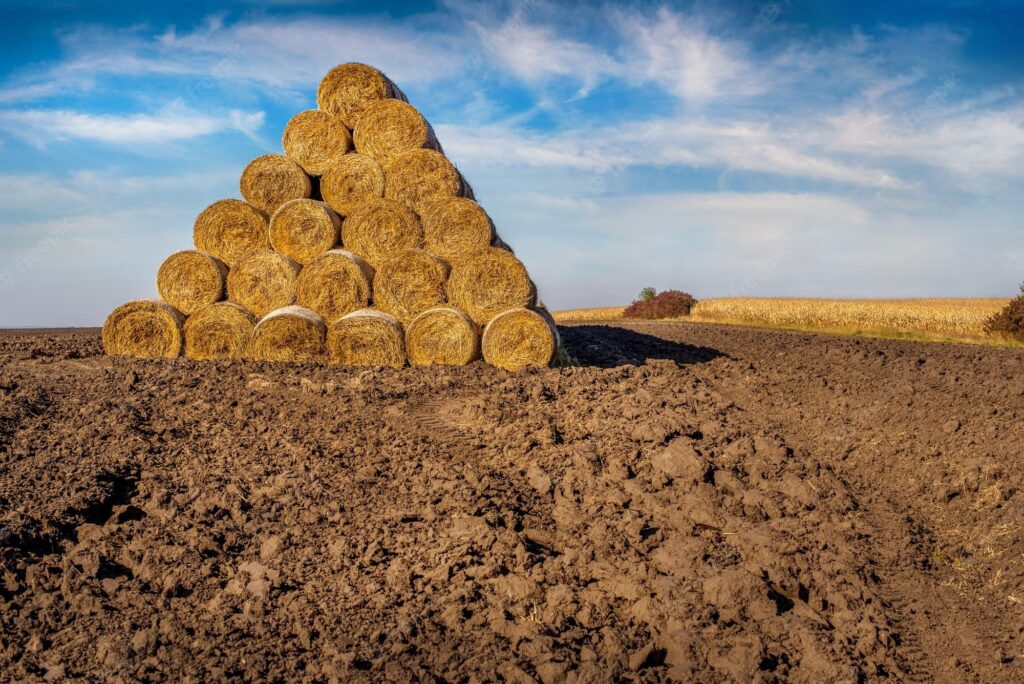
Traditionally, round bales have always been percievably “correctly” stacked in either a pyramid formation. Bales are placed on their round ends, and stacked two, three, or even six layers high forming a pyramid. It seems ideal because it puts the most number of bales in as small an area as possible. Where it’s a terrible idea, however, is how these bales, in direct contact with each other and the ground, tend to spoil from the outside in. Bales cannot breathe well in such a formation, thus spoilage quickly results, causing significant losses in feed quality (which is very costly).
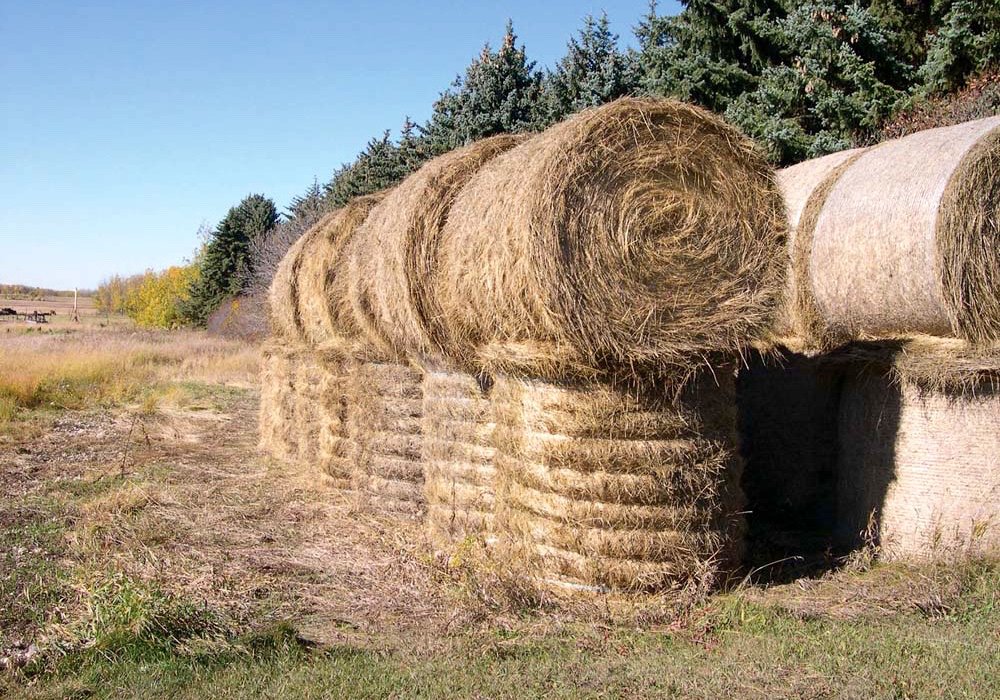
The next “better” (not really) means of stacking bales is in the mushroom formation. One bale are placed face-down, round edge out (sometimes another one like it on top, not pictured), and the final one is placed on top with round edge out, with the intention of wicking off moisture. Again, this is to stack as many bales together while taking up as less space as possible. This formation takes more area than the pyramid stack, but allows for more air flow. However, it still doesn’t reduce spoilage by contact with other bales. Again, feed value (which is a loss in money) is lost with spoilage that will occur.
The best way to stack bales is, if you have the land, to use the “simple stacking” method. Bales are placed in a row with the flat faces facing each other, with the row going from northwest to southeast or wherever the prevailing winds blow from, and each face being four to six inches apart. Each row must be two to three feet apart. This way the wind can blow down each row and get in between each bale, wicking away moisture and better preserving feed quality. Snow can melt more easily in between the rows as well.
Tip #12: Know when to save your hay based on your animals’ nutritional needs.
Good quality hay is valuable hay. That said, use it only when you need to use it or rather, when your animals are in need of it. When they’re not in need of it, don’t use it. Use poorer quality feed instead, or supplement poorer quality with as little of the good quality feed to stretch out the supply until you actually need that good quality feed.
Your animals’ nutritional requirements will tell you whether or not you need that good hay. Females that are lactating and suckling young (or are being used for milk production) need higher quality feed than females that are pregnant and not in milk. On the same token, younger stock that are growing and filling out need better quality feed than when they’re older and nearly reaching maturity.
Thin animals need better quality feed than fat animals; these animals are trying to fill out and gain weight as opposed to the fatter animals that are either only needing to maintain their level of fatness, or lose some. This is especially true during the winter. Senior animals (if you have any) will need good quality feed to keep up with their health as well compared with younger stock.
The poop will tell you if they’re needing more or less quality feed, especially with cattle. Runny poop means they’re getting too much of the good stuff, and a lot of the protein is being lost as waste. Stacked manure that looks a bit drier than normal means they might need better quality feed.
Once again, if you’re unsureof the quality, get a feed test.
Tip #13: Mind the body condition score of your animals.
Continuing from Tip #12, body condition scoring your animals can save you a lot of headache and feed costs down the road. Body condition scoring is assessing the level of fatness of your animals. It is done by doing a “feel test” where you determine how much fat is covering the ribs, spine, hips, and tail head of your animals. It can be done on any animal, including humans. However, it’s most utilized in the livestock industry to determine whether animals are too fat, too thin, or just right (heh, the “Goldilocs Principle” as I like to call it).
In ruminants, BCS must be done on the right side. The left side is where the rumen sits, which can skew the judgement of the score. There’s no best way to do this, but most either start from the ribs and move to the tail head, or vice versa. Depends on the docility of the animal.
As mentioned above, the thinner the animal, the higher quality feed is generally needed. This is especially true when entering into the cold winter months, or for a cow that is still suckling a calf (or producing milk). Thinner animals are a greater challenge to feed to put weight on when their bodies are fighting to stay warm. They are certainly more costlier to feed than fatter animals as they may require more supplementation than the hay you’re intending to purchase for them.
Tip #14: Have the kind of hay feeders that reduces wastage.
At feeding time, feed waste is costly. Animals are notorious for pulling out more than what they need and letting it fall on the ground, stepping on it and defecating on it. Certain feeders may help to reduce that waste, however that all depends on what you’re willing to spend on and how much of a stickler you are about feed waste.
In the next tip, we will discuss how such “feed waste” is beneficial for your pastures. However, if you’re feeding in a drylot pen where manure is going to stack up and will need to be hauled out in the spring, this particular tip might be of some help.
Bale feeders alone help reduce feed waste as opposed to no feeder whatsoever. However, there’s lots of types of makes and models of feeders that are proposed to be better at reducing feed waste compared with others. Just beware: companies need to make money too, and will make some good selling points to make them seem like they’re the best choice over their competition!
Feeders that have narrower openings for animals to reach in and grab feed is most ideal. Hay nets are commonly used for horses and sometimes sheep and goats. Slatted, angled feeders with a bottom tray and narrow openings are often used for feeding goats and sheep. For cattle, though, it’s a little tougher because they grab at hay with their tongues rather than their lips.
Bale feeders (especially those that are designed for large round bales) for cattle range from simple round-iron feeders to bale cradles to the heavy-duty cone feeders. Research done on the various designs found that feeders with solid sheeted bottoms saved 30% on feed waste compared with open-bottom feeders, and the cone feeder only had as little as 5% feed waste. They also found that feeders where animals are comfortable in keeping their heads within the feeder perimeter as opposed to pulling out their heads and eating their mouthful of hay also saves on feed waste.
Also, less feeders or less bales available for a herd means more competition between animals, which means more feed will be wasted. Providing ample space and opportunity for all animals means less pushing and shoving and less feed going on the ground. You can read more from MSU Extension and this UNL publication.
Tip #15: Feed animals where nutrients are going treturned back to the soil to minimize the cost of manure hauling in the spring.
This is a good tip if you’re not a fan of having to move around big feed-waste-saving bale feeders–either because of the labour involved or your lack of available equipment–and you have enough pasture acreage to do some “bale grazing” during the winter months (and, most importantly, your land and soil allows you to do so within your context). Feeding hay on the land where the “waste” left behind means more organic matter laid down and more seeds added to the current soil seed bank. It also means manure is staying where it was dropped, and you don’t have to come back in the spring to clean it up and haul it somewhere else.
This is basically what bale grazing is all about. Those who practice it and swear by its effectiveness set out hay bales on a particular area that needs attention, spacing them so that there’s room for animals to get in and around and electric wire to control access. Animals are allowed a certain number of bales per a certain number of days, and moved to each set of bales accordingly. While they are “forced” to clean up as much of the bale as possible, plenty of feed is left behind that was trodden on, and pooped on. In the spring, these areas can be noted as “bare patches” that are pretty much feed left behind, but get eventually broken down into the soil.
Personally and professionally I know of various producers who have bale grazed who have found that their pastures, over the next few years, increase in productivity by a considerable amount (unfortunately I have no data to confirm or deny this). The areas that have been bale grazed show up with plants that are more robust, taller, and deeper green than surrounding areas. This doesn’t occur the following summer, but in two or three years. Some weeds do come up, by they don’t last long as the grasses and legumes quickly take over.
Tip #16: Stockpile pasture[s] to extend the grazing season for as long as possible.
Extending the grazing season is probably the most cost-saving venture you can do for your operation. Stockpiling pastures is one method, among others. This means setting aside an area of the farm or homestead to be grazed in the fall or winter. Plants are allowed to reach maturity, and more to come up from below. The area is not grazed at all during the entire growing season.
Stockpiling can also mean grazing your animals so that you’re still leaving plenty of leaf material behind. The rule of thumb here is the more leaf material left behind, the faster plants will recover. However, this depends on the time of year. Spring growth is always faster than summer growth. Moves will be faster and happening sooner earlier in the year than later. Regardless, the key is to leave as much material behind as you dare so that you’re not putting yourself in a corner with no more pasture when growth has slowed down to a crawl to when snow arrives.
Tip #17: Plant and utilize annual or biennial cover crops with forages that maintain good to high quality into the fall and winter.
Planting a cover crop mixture on some part of the farm that both needs the extra diversity both above and below ground is another tip to help extend the grazing season along with stockpiling. The species you choose depends on your context in terms of soil type, weed issues, desire to attract pollinators, feed value, affordability with seed prices and getting the area seeded, nutrient cycling, organic matter, and more. The combinations of species you choose is massive, however I will leave you with a few rules of thumb.
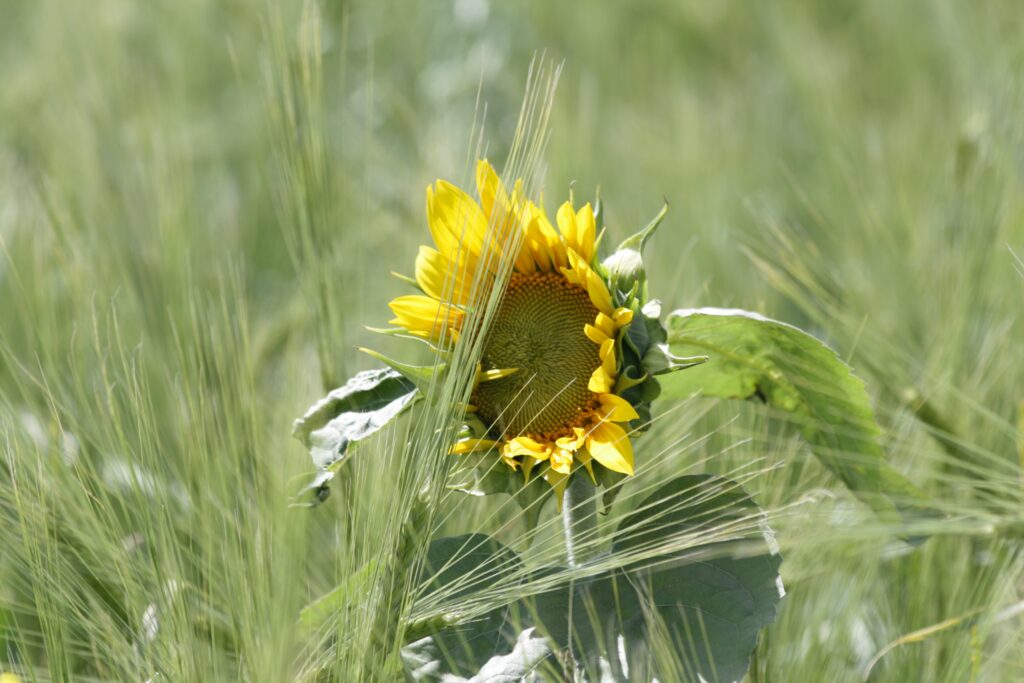
Diversity is key in terms of plant families. Choose more than just grasses and legumes as these are just two plant families that already exist in your pastures (Families Graminaceae and Fabaceae, respectively). Plants of other plant families is recommended, such as sunflowers and chicory (Family Asteraceae), brassicas including mustard, forage rape, forage collards, and tillage radish (Family Brassicaceae), plantain (Family Plantaginaceae), phacelia (Family Boraginaceae), carrot, caraway, Queen Anne’s lace, dill, parsley or parsnip (Family Apiaceae), and more!
Diversity is also key in terms of cool-season (C3) or warm-season (C4) plants. These should also be included in the mix so that there’s always a growing plant and a living root in the soil throughout the year.
With those two points in mind, another rule of thumb for creating a mix is to have half of the mix as grass species, and a quarter in legumes, and the final quarter as broad-leafed forbs. Brassicas should never exceed more than 4 pounds per acre in a seed mix, as they grow big leaves that will shade out other plants. Other forbs that are prone to spreading and covering the ground should also be included at a low rate compared with plants that stand erect and don’t spread laterally.
Creating a cover crop mix can be tricky and confusing, so I recommend speaking with a cover crop seed specialist or your agricultural consultant who’s already familiar with the variety of species involved in creating a good mix for you based on your context and specifications.
That said, these cover crop mixes can be left to grow throughout the year and be set aside for grazing later in the year, taking pressure off your pastures. Planned right, these mixes can yield a great amount of forage that is also high in quality to carry your stock further past the grazing season.
The Homestead/Farming Business
Tip #18: Start a homestead or farm business if you haven’t already.
Starting and owning a business means that you are exchanging your special, unique product (or service) for income that could go right back to your homestead or farm operation. This is a huge advantage for you and your farm because it means less reliance on that off-farm job or having to scrape by with animals to feed and bills to pay.
Treating the farm operation as a business means that you are setting yourself apart from others with a unique story to tell and an equally unique product (or service) to sell that will attract potential customers or clients. People love a story, and are willing to buy from you when your story inspires them to support you via their pocket book. It’s a win-win scenario if you’re willing to put in the time and effort.
Tip #19: Take advantage of exemptions on sales tax if applicable to your area.
This tip is a difficult one to expand on as it covers a big grey area in terms of location and state or provincial laws. My advice is to seek out a local accountant who can point you in the right direction and give you some pointers you need for your context.
Tip #20: Keep and maintain up-to-date financial records of your livestock enterprise[s].
Keeping record of everything to do with the livestock operation–from veterinary expenses to feed costs to depreciation on machinery and buildings–allows you to see where you’re losing money and where you’re doing just fine. The results may surprise you, and may also cause you re-evaluate your situation. Where are you losing money? What can you do to change that? What areas are you succeeding? What can you do to make it even better, if it’s within your context? These sort of questions will allow you to paint a picture of your successes and failures, and influence your plans for the future.
Conclusion
There are a lot of tips to consider when figuring out means on how to save money on buying hay. You may find some more helpful than others. Look at your context before acting on any one of these tips, and evaluate whether they will be of value to you or not. If you need any help with your situation, I would be happy to help in any way I can.